电商项目第二天
0.学习目标
- 会使用nginx进行反向代理
- 实现商品分类查询功能
- 掌握cors解决跨域
- 实现品牌查询功能
1.使用域名访问本地项目
1.1.统一环境
我们现在访问页面使用的是:http://localhost:9001
有没有什么问题?
实际开发中,会有不同的环境:
- 开发环境:自己的电脑
- 测试环境:提供给测试人员使用的环境
- 预发布环境:数据是和生成环境的数据一致,运行最新的项目代码进去测试
- 生产环境:项目最终发布上线的环境
如果不同环境使用不同的ip去访问,可能会出现一些问题。为了保证所有环境的一致,我们会在各种环境下都使用域名来访问。
我们将使用以下域名:
- 主域名是:www.leyou.com,
- 管理系统域名:manage.leyou.com
- 网关域名:api.leyou.com
- ...
但是最终,我们希望这些域名指向的还是我们本机的某个端口。
那么,当我们在浏览器输入一个域名时,浏览器是如何找到对应服务的ip和端口的呢?
1.2.域名解析
一个域名一定会被解析为一个或多个ip。这一般会包含两步:
- 本地域名解析
浏览器会首先在本机的hosts文件中查找域名映射的IP地址,如果查找到就返回IP ,没找到则进行域名服务器解析,一般本地解析都会失败,因为默认这个文件是空的。
- Windows下的hosts文件地址:C:/Windows/System32/drivers/etc/hosts
- Linux下的hosts文件所在路径: /etc/hosts
样式:
# My hosts
127.0.0.1 localhost
0.0.0.0 account.jetbrains.com
127.0.0.1 www.xmind.net- 域名服务器解析
本地解析失败,才会进行域名服务器解析,域名服务器就是网络中的一台计算机,里面记录了所有注册备案的域名和ip映射关系,一般只要域名是正确的,并且备案通过,一定能找到。
1.3.解决域名解析问题
我们不可能去购买一个域名,因此我们可以伪造本地的hosts文件,实现对域名的解析。修改本地的host为:
127.0.0.1 api.leyou.com
127.0.0.1 manage.leyou.com
这样就实现了域名的关系映射了。
每次在C盘寻找hosts文件并修改是非常麻烦的,给大家推荐一个快捷修改host的工具,在课前资料中可以找到:

效果:

我们添加了两个映射关系:
- 127.0.0.1 api.leyou.com :我们的网关Zuul
- 127.0.0.1 manage.leyou.com:我们的后台系统地址
现在,ping一下域名试试是否畅通:

OK!
1.4.nginx解决端口问题
虽然域名解决了,但是现在如果我们要访问,还得自己加上端口:http://manage.taotao.com:9001。
这就不够优雅了。我们希望的是直接域名访问:http://manage.taotao.com。这种情况下端口默认是80,如何才能把请求转移到9001端口呢?
这里就要用到反向代理工具:Nginx
1.4.1.什么是Nginx

nginx可以作为web服务器,但更多的时候,我们把它作为网关,因为它具备网关必备的功能:
- 反向代理
- 负载均衡
- 动态路由
- 请求过滤
1.4.2.nginx作为web服务器
Web服务器分2类:
web应用服务器,如:
- tomcat
- resin
- jetty
web服务器,如:
- Apache 服务器
- Nginx
- IIS
区分:web服务器不能解析jsp等页面,只能处理js、css、html等静态资源。
并发:web服务器的并发能力远高于web应用服务器。
Nginx + tomcat
1.4.3.nginx作为反向代理
什么是反向代理?
- 代理:通过客户机的配置,实现让一台服务器代理客户机,客户的所有请求都交给代理服务器处理。
- 反向代理:用一台服务器,代理真实服务器,用户访问时,不再是访问真实服务器,而是代理服务器。
nginx可以当做反向代理服务器来使用:
- 我们需要提前在nginx中配置好反向代理的规则,不同的请求,交给不同的真实服务器处理
- 当请求到达nginx,nginx会根据已经定义的规则进行请求的转发,从而实现路由功能
利用反向代理,就可以解决我们前面所说的端口问题,如图
如果是安装在本机:

如果是安装在虚拟机:

1.4.4.安装和使用
windows下安装
安装非常简单,把课前资料提供的nginx直接解压即可,绿色免安装,舒服!

我们在本地安装一台nginx:

目录结构:

使用
nginx可以通过命令行来启动,操作命令:
- 启动:
start nginx.exe - 停止:
nginx.exe -s stop - 重新加载:
nginx.exe -s reload
虚拟机安装
- 上传安装包:
课前资料有安装包:

新增用户:
useradd leyou上传文件到目录:/home/leyou/
解压
tar -xvf nginx-1.10.0.tar.gz
- 配置
进入nginx目录
cd nginx-1.10.0
./configure --prefix=/opt/nginx --sbin-path=/usr/bin/nginx这里指定安装的目录是在:/opt/nginx目录下
编译安装
make && make install- 启动:
nginx可以在任何位置通过命令行来启动,操作命令:
- 启动:
nginx - 停止:
nginx -s stop - 重新加载:
nginx -s reload
关闭防火墙:chkconfig iptables off
- 测试:

反向代理配置
示例:

nginx中的每个server就是一个反向代理配置,可以有多个server
完整配置:
#user  nobody;
worker_processes  1;

events {
    worker_connections  1024;
}

http {
    include       mime.types;
    default_type  application/octet-stream;
    sendfile        on;

    keepalive_timeout  65;

    gzip  on;
    server {
        listen       80;
        server_name  manage.leyou.com;

        proxy_set_header X-Forwarded-Host $host;
        proxy_set_header X-Forwarded-Server $host;
        proxy_set_header X-Forwarded-For $proxy_add_x_forwarded_for;

        location / {
            proxy_pass http://192.168.58.2:9001; # 主机地址 下的9001端口
            proxy_connect_timeout 600;
            proxy_read_timeout 600;
        }
    }
    server {
        listen       80;
        server_name  api.leyou.com;

        proxy_set_header X-Forwarded-Host $host;
        proxy_set_header X-Forwarded-Server $host;
        proxy_set_header X-Forwarded-For $proxy_add_x_forwarded_for;

        location / {
            proxy_pass http://192.168.58.2:10010;
            proxy_connect_timeout 600;
            proxy_read_timeout 600;
        }
    }
}
主机绑定问题
默认我们的前端项目绑定的host是:localhost,因此只能在本机访问,要想通过虚拟机访问,就必须修改host绑定地址。
修改leyou-manage-web下的config目录下的index.js文件:

修改绑定地址:

0.0.0.0代表任意地址。
1.5.测试
启动nginx,然后用域名访问后台管理系统:

现在实现了域名访问网站了,中间的流程是怎样的呢?

- 浏览器准备发起请求,访问http://mamage.leyou.com,但需要进行域名解析
- 优先进行本地域名解析,因为我们修改了hosts,所以解析成功,得到地址:127.0.0.1
- 请求被发往解析得到的ip,并且默认使用80端口:http://127.0.0.1:80
本机的nginx一直监听80端口,因此捕获这个请求
- nginx中配置了反向代理规则,将manage.leyou.com代理到127.0.0.1:9001,因此请求被转发
- 后台系统的webpack server监听的端口是9001,得到请求并处理,完成后将响应返回到nginx
- nginx将得到的结果返回到浏览器
2.实现商品分类查询
商城的核心自然是商品,而商品多了以后,肯定要进行分类,并且不同的商品会有不同的品牌信息,其关系如图所示:

- 一个商品分类下有很多商品
- 一个商品分类下有很多品牌
- 而一个品牌,可能属于不同的分类
- 一个品牌下也会有很多商品
因此,我们需要依次去完成:商品分类、品牌、商品的开发。
2.1.导入数据
首先导入课前资料提供的sql:

我们先看商品分类表:

CREATE TABLE `tb_category` (
  `id` bigint(20) NOT NULL AUTO_INCREMENT COMMENT '类目id',
  `name` varchar(20) NOT NULL COMMENT '类目名称',
  `parent_id` bigint(20) NOT NULL COMMENT '父类目id,顶级类目填0',
  `is_parent` tinyint(1) NOT NULL COMMENT '是否为父节点,0为否,1为是',
  `sort` int(4) NOT NULL COMMENT '排序指数,越小越靠前',
  PRIMARY KEY (`id`),
  KEY `key_parent_id` (`parent_id`) USING BTREE
) ENGINE=InnoDB AUTO_INCREMENT=1424 DEFAULT CHARSET=utf8 COMMENT='商品类目表,类目和商品(spu)是一对多关系,类目与品牌是多对多关系';因为商品分类会有层级关系,因此这里我们加入了parent_id字段,对本表中的其它分类进行自关联。
2.2.页面实现
2.2.1.页面分析
首先我们看下要实现的效果:

商品分类之间是会有层级关系的,采用树结构去展示是最直观的方式。
一起来看页面,对应的是/pages/item/Category.vue:

页面模板:
<v-card>
    <v-flex xs12 sm10>
        <v-tree url="/item/category/list"
                :isEdit="isEdit"
                @handleAdd="handleAdd"
                @handleEdit="handleEdit"
                @handleDelete="handleDelete"
                @handleClick="handleClick"
                />
    </v-flex>
</v-card>v-card:卡片,是vuetify中提供的组件,提供一个悬浮效果的面板,一般用来展示一组数据。

v-flex:布局容器,用来控制响应式布局。与BootStrap的栅格系统类似,整个屏幕被分为12格。我们可以控制所占的格数来控制宽度:

本例中,我们用sm10控制在小屏幕及以上时,显示宽度为10格
v-tree:树组件。Vuetify并没有提供树组件,这个是我们自己编写的自定义组件:

里面涉及一些vue的高级用法,大家暂时不要关注其源码,会用即可。
2.2.2.树组件的用法
也可参考课前资料中的:《自定义Vue组件的用法.md》
这里我贴出树组件的用法指南。
属性列表:
| 属性名称 | 说明 | 数据类型 | 默认值 |
|---|---|---|---|
| url | 用来加载数据的地址,即延迟加载 | String | - |
| isEdit | 是否开启树的编辑功能 | boolean | false |
| treeData | 整颗树数据,这样就不用远程加载了 | Array | - |
这里推荐使用url进行延迟加载,每当点击父节点时,就会发起请求,根据父节点id查询子节点信息。
当有treeData属性时,就不会触发url加载
远程请求返回的结果格式:
[
    {
        "id": 74,
        "name": "手机",
        "parentId": 0,
        "isParent": true,
        "sort": 2
    },
     {
        "id": 75,
        "name": "家用电器",
        "parentId": 0,
        "isParent": true,
        "sort": 3
    }
]
事件:
| 事件名称 | 说明 | 回调参数 |
|---|---|---|
| handleAdd | 新增节点时触发,isEdit为true时有效 | 新增节点node对象,包含属性:name、parentId和sort |
| handleEdit | 当某个节点被编辑后触发,isEdit为true时有效 | 被编辑节点的id和name |
| handleDelete | 当删除节点时触发,isEdit为true时有效 | 被删除节点的id |
| handleClick | 点击某节点时触发 | 被点击节点的node对象,包含全部信息 |
完整node的信息
回调函数中返回完整的node节点会包含以下数据:
{
    "id": 76, // 节点id
    "name": "手机", // 节点名称
    "parentId": 75, // 父节点id
    "isParent": false, // 是否是父节点
    "sort": 1, // 顺序
    "path": ["手机", "手机通讯", "手机"] // 所有父节点的名称数组
}
2.3.实现功能
2.3.1.url异步请求
给大家的页面中已经配置了url,我们刷新页面看看会发生什么:
<v-tree url="/item/category/list"
        :isEdit="isEdit"
        @handleAdd="handleAdd"
        @handleEdit="handleEdit"
        @handleDelete="handleDelete"
        @handleClick="handleClick"
        />
刷新页面,可以看到:

页面发起了一条请求:http://api.leyou.com/api/item/category/list?pid=0
大家可能会觉得很奇怪,我们明明是使用的相对路径,讲道理发起的请求地址应该是:
http://manage.leyou.com/item/category/list
但实际却是:
http://api.leyou.com/api/item/category/list?pid=0
这是因为,我们有一个全局的配置文件,对所有的请求路径进行了约定:


路径是http://api.leyou.com,并且默认加上了/api的前缀,而我们的Nginx又完成了反向代理,将这个地址代理到了http://127.0.0.1:10010,也就是我们的Zuul网关,最终再被zuul转到微服务。
因此接下来,我们要做的事情就是编写后台接口,返回对应的数据即可。
2.3.2.实体类
在ly-item-interface中添加category实体类:

@Table(name="tb_category")
@Data
public class Category {
    @Id
    @KeySql(useGeneratedKeys=true)
    private Long id;
    private String name;
    private Long parentId;
    private Boolean isParent;
    private Integer sort;
    // getter和setter略
    // 注意isParent的get和set方法
}需要注意的是,这里要用到通用mapper和jpa的注解,因此我们在ly-item-iterface中添加mapper依赖
<dependency>
    <groupId>tk.mybatis</groupId>
    <artifactId>mapper-core</artifactId>
    <version>1.0.4</version>
</dependency>
结构:

2.3.3.controller
编写一个controller一般需要知道四个内容:
- 请求方式:决定我们用GetMapping还是PostMapping
- 请求路径:决定映射路径
- 请求参数:决定方法的参数
- 返回值结果:决定方法的返回值
在刚才页面发起的请求中,我们就能得到绝大多数信息:

- 请求方式:Get
- 请求路径:/api/item/category/list。其中/api是网关前缀,/item是网关的路由映射,真实的路径应该是/category/list
- 请求参数:pid=0,根据tree组件的说明,应该是父节点的id,第一次查询为0,那就是查询一级类目
- 返回结果:??
根据前面tree组件的用法我们知道,返回的应该是json数组:
[
    {
        "id": 74,
        "name": "手机",
        "parentId": 0,
        "isParent": true,
        "sort": 2
    },
     {
        "id": 75,
        "name": "家用电器",
        "parentId": 0,
        "isParent": true,
        "sort": 3
    }
]
对应的java类型可以是List集合,里面的元素就是类目对象了。
controller代码:
@RestController
@RequestMapping("category")
public class CategoryController {

    @Autowired
    private CategoryService categoryService;
    /**
     * 根据父节点查询商品类目
     *
     * @param pid
     * @return
     */
    @GetMapping("list")
    public ResponseEntity<List<Category>> queryByParentId(
            @RequestParam(value = "pid", defaultValue = "0") Long pid) {
        return ResponseEntity.ok(this.categoryService.queryListByParent(pid));
    }
}
2.3.4.service
一般service层我们会定义接口和实现类,不过这里我们就偷懒一下,直接写实现类了:
@Service
public class CategoryService {

    @Autowired
    private CategoryMapper categoryMapper;

    public List<Category> queryCategoryListByPid(Long pid) {
        // 查询条件,mapper会把对象中的非空属性作为查询条件
        Category t = new Category();
        t.setParentId(pid);
        List<Category> list = categoryMapper.select(t);
        // 判断结果
        if(CollectionUtils.isEmpty(list)){
            throw new LyException(ExceptionEnum.CATEGORY_NOT_FOND);
        }
        return list;
    }
}
2.3.5.mapper
我们使用通用mapper来简化开发:
public interface CategoryMapper extends Mapper<Category> {
}
要注意,我们并没有在mapper接口上声明@Mapper注解,那么mybatis如何才能找到接口呢?
我们在启动类上添加一个扫描包功能:
@SpringBootApplication
@EnableDiscoveryClient
@MapperScan("com.leyou.item.mapper") // 扫描mapper包
public class LyItemApplication {
    public static void main(String[] args) {
        SpringApplication.run(LyItemApplication.class, args);
    }
}
项目结构:

2.3.6.启动并测试
我们不经过网关,直接访问:

然后试试网关是否畅通:

一切OK!
然后刷新页面查看:

发现报错了!
浏览器直接访问没事,但是这里却报错,什么原因?
2.4.跨域问题
2.4.1.什么是跨域
跨域是指跨域名的访问,以下情况都属于跨域:
| 跨域原因说明 | 示例 |
|---|---|
| 域名不同 | www.jd.com 与 www.taobao.com |
| 域名相同,端口不同 | www.jd.com:8080 与 www.jd.com:8081 |
| 二级域名不同 | item.jd.com 与 miaosha.jd.com |
如果域名和端口都相同,但是请求路径不同,不属于跨域,如:
www.jd.com/item
www.jd.com/goods
而我们刚才是从manage.leyou.com去访问api.leyou.com,这属于二级域名不同,跨域了。
2.4.2.为什么有跨域问题?
跨域不一定会有跨域问题。
因为跨域问题是浏览器对于ajax请求的一种安全限制:一个页面发起的ajax请求,只能是于当前页同域名的路径,这能有效的阻止跨站攻击。
因此:跨域问题 是针对ajax的一种限制。
但是这却给我们的开发带来了不变,而且在实际生成环境中,肯定会有很多台服务器之间交互,地址和端口都可能不同,怎么办?
2.4.3.解决跨域问题的方案
目前比较常用的跨域解决方案有3种:
- Jsonp
最早的解决方案,利用script标签可以跨域的原理实现。
限制:
- 需要服务的支持
- 只能发起GET请求
- nginx反向代理
思路是:利用nginx反向代理把跨域为不跨域,支持各种请求方式
缺点:需要在nginx进行额外配置,语义不清晰
- CORS
规范化的跨域请求解决方案,安全可靠。
优势:
- 在服务端进行控制是否允许跨域,可自定义规则
- 支持各种请求方式
缺点:
- 会产生额外的请求
我们这里会采用cors的跨域方案。
2.5.cors解决跨域
2.5.1.什么是cors
CORS是一个W3C标准,全称是"跨域资源共享"(Cross-origin resource sharing)。
它允许浏览器向跨源服务器,发出XMLHttpRequest请求,从而克服了AJAX只能同源使用的限制。
CORS需要浏览器和服务器同时支持。目前,所有浏览器都支持该功能,IE浏览器不能低于IE10。
- 浏览器端:
目前,所有浏览器都支持该功能(IE10以下不行)。整个CORS通信过程,都是浏览器自动完成,不需要用户参与。
- 服务端:
CORS通信与AJAX没有任何差别,因此你不需要改变以前的业务逻辑。只不过,浏览器会在请求中携带一些头信息,我们需要以此判断是否运行其跨域,然后在响应头中加入一些信息即可。这一般通过过滤器完成即可。
2.5.2.原理有点复杂
浏览器会将ajax请求分为两类,其处理方案略有差异:简单请求、特殊请求。
简单请求
只要同时满足以下两大条件,就属于简单请求。:
(1) 请求方法是以下三种方法之一:
- HEAD
- GET
- POST
(2)HTTP的头信息不超出以下几种字段:
- Accept
- Accept-Language
- Content-Language
- Last-Event-ID
- Content-Type:只限于三个值
application/x-www-form-urlencoded、multipart/form-data、text/plain
当浏览器发现发现的ajax请求是简单请求时,会在请求头中携带一个字段:Origin.

Origin中会指出当前请求属于哪个域(协议+域名+端口)。服务会根据这个值决定是否允许其跨域。
如果服务器允许跨域,需要在返回的响应头中携带下面信息:
Access-Control-Allow-Origin: http://manage.leyou.com
Access-Control-Allow-Credentials: true- Access-Control-Allow-Origin:可接受的域,是一个具体域名或者*,代表任意
- Access-Control-Allow-Credentials:是否允许携带cookie,默认情况下,cors不会携带cookie,除非这个值是true
注意:
如果跨域请求要想操作cookie,需要满足3个条件:
- 服务的响应头中需要携带Access-Control-Allow-Credentials并且为true。
- 浏览器发起ajax需要指定withCredentials 为true
- 响应头中的Access-Control-Allow-Origin一定不能为*,必须是指定的域名
特殊请求
不符合简单请求的条件,会被浏览器判定为特殊请求,,例如请求方式为PUT。
预检请求
特殊请求会在正式通信之前,增加一次HTTP查询请求,称为"预检"请求(preflight)。
浏览器先询问服务器,当前网页所在的域名是否在服务器的许可名单之中,以及可以使用哪些HTTP动词和头信息字段。只有得到肯定答复,浏览器才会发出正式的XMLHttpRequest请求,否则就报错。
一个“预检”请求的样板:
OPTIONS /cors HTTP/1.1
Origin: http://manage.leyou.com
Access-Control-Request-Method: PUT
Access-Control-Request-Headers: X-Custom-Header
Host: api.leyou.com
Accept-Language: en-US
Connection: keep-alive
User-Agent: Mozilla/5.0...
与简单请求相比,除了Origin以外,多了两个头:
- Access-Control-Request-Method:接下来会用到的请求方式,比如PUT
- Access-Control-Request-Headers:会额外用到的头信息
预检请求的响应
服务的收到预检请求,如果许可跨域,会发出响应:
HTTP/1.1 200 OK
Date: Mon, 01 Dec 2008 01:15:39 GMT
Server: Apache/2.0.61 (Unix)
Access-Control-Allow-Origin: http://manage.leyou.com
Access-Control-Allow-Credentials: true
Access-Control-Allow-Methods: GET, POST, PUT
Access-Control-Allow-Headers: X-Custom-Header
Access-Control-Max-Age: 1728000
Content-Type: text/html; charset=utf-8
Content-Encoding: gzip
Content-Length: 0
Keep-Alive: timeout=2, max=100
Connection: Keep-Alive
Content-Type: text/plain除了Access-Control-Allow-Origin和Access-Control-Allow-Credentials以外,这里又额外多出3个头:
- Access-Control-Allow-Methods:允许访问的方式
- Access-Control-Allow-Headers+:允许携带的头
- Access-Control-Max-Age:本次许可的有效时长,单位是秒,过期之前的ajax请求就无需再次进行预检了
如果浏览器得到上述响应,则认定为可以跨域,后续就跟简单请求的处理是一样的了。
2.5.3.实现非常简单
虽然原理比较复杂,但是前面说过:
- 浏览器端都有浏览器自动完成,我们无需操心
- 服务端可以通过拦截器统一实现,不必每次都去进行跨域判定的编写。
事实上,SpringMVC已经帮我们写好了CORS的跨域过滤器:CorsFilter ,内部已经实现了刚才所讲的判定逻辑,我们直接用就好了。
在ly-api-gateway中编写一个配置类,并且注册CorsFilter:
import org.springframework.context.annotation.Bean;
import org.springframework.context.annotation.Configuration;
import org.springframework.web.cors.CorsConfiguration;
import org.springframework.web.cors.UrlBasedCorsConfigurationSource;
import org.springframework.web.filter.CorsFilter;

@Configuration
public class GlobalCorsConfig {
    @Bean
    public CorsFilter corsFilter() {
        //1.添加CORS配置信息
        CorsConfiguration config = new CorsConfiguration();
        //1) 允许的域,不要写*,否则cookie就无法使用了
        config.addAllowedOrigin("http://manage.leyou.com");
        //2) 是否发送Cookie信息
        config.setAllowCredentials(true);
        //3) 允许的请求方式
        config.addAllowedMethod("OPTIONS");
        config.addAllowedMethod("HEAD");
        config.addAllowedMethod("GET");
        config.addAllowedMethod("PUT");
        config.addAllowedMethod("POST");
        config.addAllowedMethod("DELETE");
        config.addAllowedMethod("PATCH");
        // 4)允许的头信息
        config.addAllowedHeader("*");

        //2.添加映射路径,我们拦截一切请求
        UrlBasedCorsConfigurationSource configSource = new UrlBasedCorsConfigurationSource();
        configSource.registerCorsConfiguration("/**", config);

        //3.返回新的CorsFilter.
        return new CorsFilter(configSource);
    }
}
结构:

4.5.4.重启测试:
访问正常:

页面也OK了:

商品分类的增删改功能暂时就不做了,页面已经预留好了事件接口,有兴趣的同学可以完成一下。
3.品牌的查询
商品分类完成以后,自然轮到了品牌功能了。
先看看我们要实现的效果:

接下来,我们从0开始,实现下从前端到后端的完整开发。
3.1.从0开始
为了方便看到效果,我们新建一个MyBrand.vue,从0开始搭建。

内容初始化一下:
<template>
  <span>
    hello
  </span>
</template>

<script>
    export default {
        name: "my-brand"
    }
</script>

<style scoped>

</style>
改变router新的index.js,将路由地址指向MyBrand.vue

打开服务器,再次查看页面:

干干净净了。
3.2.品牌查询页面
3.2.1.data-tables组件
大家看到这个原型页面肯定能看出,其主体就是一个table。我们去Vuetify查看有关table的文档:

仔细阅读,发现v-data-table中有以下核心属性:
- dark:是否使用黑暗色彩主题,默认是false
- expand:表格的行是否可以展开,默认是false
headers:定义表头的数组,数组的每个元素就是一个表头信息对象,结构:
{ text: string, // 表头的显示文本 value: string, // 表头对应的每行数据的key align: 'left' | 'center' | 'right', // 位置 sortable: boolean, // 是否可排序 class: string[] | string,// 样式 width: string,// 宽度 }- items:表格的数据的数组,数组的每个元素是一行数据的对象,对象的key要与表头的value一致
- loading:是否显示加载数据的进度条,默认是false
- no-data-text:当没有查询到数据时显示的提示信息,string类型,无默认值
pagination.sync:包含分页和排序信息的对象,将其与vue实例中的属性关联,表格的分页或排序按钮被触发时,会自动将最新的分页和排序信息更新。对象结构:
{ page: 1, // 当前页 rowsPerPage: 5, // 每页大小 sortBy: '', // 排序字段 descending:false, // 是否降序 }- total-items:分页的总条数信息,number类型,无默认值
- select-all :是否显示每一行的复选框,Boolean类型,无默认值
- value:当表格可选的时候,返回选中的行
我们向下翻,找找有没有看起来牛逼的案例。
找到这样一条:

其它的案例都是由Vuetify帮我们对查询到的当前页数据进行排序和分页,这显然不是我们想要的。我们希望能在服务端完成对整体品牌数据的排序和分页,而这个案例恰好合适。
点击按钮,我们直接查看源码,然后直接复制到MyBrand.vue中
模板:
<template>
  <div>
    <v-data-table
      :headers="headers"
      :items="desserts"
      :search="search"
      :pagination.sync="pagination"
      :total-items="totalDesserts"
      :loading="loading"
      class="elevation-1"
    >
      <template slot="items" slot-scope="props">
        <td>{{ props.item.name }}</td>
        <td class="text-xs-right">{{ props.item.calories }}</td>
        <td class="text-xs-right">{{ props.item.fat }}</td>
        <td class="text-xs-right">{{ props.item.carbs }}</td>
        <td class="text-xs-right">{{ props.item.protein }}</td>
        <td class="text-xs-right">{{ props.item.iron }}</td>
      </template>
    </v-data-table>
  </div>
</template>
3.2.2.分析
接下来,就分析一下案例中每一部分是什么意思,搞清楚了,我们也可以自己玩了。
先看模板中table上的一些属性:
<v-data-table
              :headers="headers"
              :items="desserts"
              :pagination.sync="pagination"
              :total-items="totalDesserts"
              :loading="loading"
              class="elevation-1"
              >
</v-data-table>- headers:表头信息,是一个数组
- items:要在表格中展示的数据,数组结构,每一个元素是一行
- search:搜索过滤字段,用不到,直接删除
- pagination.sync:分页信息,包含了当前页,每页大小,排序字段,排序方式等。加上.sync代表服务端排序,当用户点击分页条时,该对象的值会跟着变化。监控这个值,并在这个值变化时去服务端查询,即可实现页面数据动态加载了。
- total-items:总条数
- loading:boolean类型,true:代表数据正在加载,会有进度条。false:数据加载完毕。

另外,在v-data-tables中,我们还看到另一段代码:
<template slot="items" slot-scope="props">
        <td>{{ props.item.name }}</td>
        <td class="text-xs-right">{{ props.item.calories }}</td>
        <td class="text-xs-right">{{ props.item.fat }}</td>
        <td class="text-xs-right">{{ props.item.carbs }}</td>
        <td class="text-xs-right">{{ props.item.protein }}</td>
        <td class="text-xs-right">{{ props.item.iron }}</td>
</template>这段就是在渲染每一行的数据。Vue会自动遍历上面传递的items属性,并把得到的对象传递给这段template中的props.item属性。我们从中得到数据,渲染在页面即可。
我们需要做的事情,主要有两件:
定义表头,编写headers
- 根据我们的表数据结构,主要是4个字段:id、name、letter、image
获取表内容:items
- 这个需要去后台查询Brand列表,可以先弄点假数据
获取总条数:totalItems
- 这个也需要去后台查,先写个假的
定义分页对象:pagination
- 这个值会有vuetify传给我们,我们不用管
数据加载进度条:loading
- 当我们加载数据时把这个值改成true,加载完毕改成false
完成页面数据渲染部分 slot="items" 的那个template标签
- 基本上把Brand的四个字段在这里渲染出来就OK了,需要跟表头(headers)对应
3.2.3.初步实现
我们先弄点假品牌数据:
 [
     {id: 2032, name: "OPPO", image: "1.jpg", letter: "O"},
     {id: 2033, name: "飞利浦", image: "2.jpg", letter: "F"},
     {id: 2034, name: "华为", image: "3.jpg", letter: "H"},
     {id: 2036, name: "酷派", image: "4.jpg", letter: "K"},
     {id: 2037, name: "魅族", image: "5.jpg", letter: "M"}
 ]
品牌中有id,name,image,letter字段。
修改模板
  <div>
    <v-data-table
      :headers="headers"
      :items="brands"
      :pagination.sync="pagination"
      :total-items="totalBrands"
      :loading="loading"
      class="elevation-1"
    >
      <template slot="items" slot-scope="props">
        <td>{{ props.item.id }}</td>
        <td class="text-xs-center">{{ props.item.name }}</td>
        <td class="text-xs-center">
          <img v-if="props.item.image" :src="props.item.image" width="130" height="40">
          <span v-else>无</span>
        </td>
        <td class="text-xs-center">{{ props.item.letter }}</td>
      </template>
    </v-data-table>
  </div>
我们修改了以下部分:
- items:指向一个brands变量,等下在js代码中定义
- total-items:指向了totalBrands变量,等下在js代码中定义
template模板中,渲染了四个字段:
- id:
- name
- image,注意,我们不是以文本渲染,而是赋值到一个
img标签的src属性中,并且做了非空判断 - letter
编写数据
接下来编写要用到的数据:
{
    data() {
      return {
        totalBrands: 0, // 总条数
        brands: [], // 当前页品牌数据,目前没有,下面模拟假数据
        loading: true, // 是否在加载中
        pagination: {}, // 分页信息
        headers: [ // 头信息
          {text: 'id', align: 'center', value: 'id'},
          {text: '名称', align: 'center', sortable: false, value: 'name'},
          {text: 'LOGO', align: 'center', sortable: false, value: 'image'},
          {text: '首字母', align: 'center', value: 'letter', sortable: true,}
        ]
      }
  }
}
编写函数,初始化数据
接下来就是对brands和totalBrands完成赋值动作了。
我们编写一个函数来完成赋值,提高复用性:
methods:{
    getDataFromServer(){ // 从服务的加载数据的方法。
        // 打印一句话,证明在加载
        console.log("开始加载了。。。。")
        // 开启加载
        this.loading = true;
        // 模拟延迟一段时间,随后进行赋值
        setTimeout(() => {
            // 然后赋值给brands
            this.brands = [
              {"id": 2032,"name": "OPPO", "image": "1.jpg","letter": "O"},
              {"id": 2033, "name": "飞利浦","image": "2.jpg", "letter": "F"},
              {"id": 2034,"name": "华为(HUAWEI)","image": "3.jpg","letter": "H"},
              {"id": 2036,"name": "酷派(Coolpad)","image": "4.jpg","letter": "K"},
              {"id": 2037,"name": "魅族(MEIZU)","image": "5.jpg","letter": "M"}
            ];
            // 总条数暂时写死
            this.totalBrands = 20;
            // 完成赋值后,把加载状态赋值为false
            this.loading = false;
        },400)
    }
}
然后使用生命周期钩子函数,在Vue实例初始化完毕后调用这个方法,这里使用created函数:
created(){ // 渲染后执行
    // 查询数据
    this.getDataFromServer();
}
完整代码
<template>
  <div>
    <v-data-table
      :headers="headers"
      :items="brands"
      :pagination.sync="pagination"
      :total-items="totalBrands"
      :loading="loading"
      class="elevation-1"
    >
      <template slot="items" slot-scope="props">
        <td>{{ props.item.id }}</td>
        <td class="text-xs-center">{{ props.item.name }}</td>
        <td class="text-xs-center"><img :src="props.item.image"></td>
        <td class="text-xs-center">{{ props.item.letter }}</td>
      </template>
    </v-data-table>
  </div>
</template>

<script>
  export default {
    name: "my-brand",
    data() {
      return {
        totalBrands: 0, // 总条数
        brands: [], // 当前页品牌数据
        loading: true, // 是否在加载中
        pagination: {}, // 分页信息
        headers: [
          {text: 'id', align: 'center', value: 'id'},
          {text: '名称', align: 'center', sortable: false, value: 'name'},
          {text: 'LOGO', align: 'center', sortable: false, value: 'image'},
          {text: '首字母', align: 'center', value: 'letter', sortable: true,}
        ]
      }
    },
    mounted(){ // 渲染后执行
      // 查询数据
      this.getDataFromServer();
    },
    methods:{
      getDataFromServer(){ // 从服务的加载数据的方法。
        console.log(this.pagination);
        // 开启加载
        this.loading = true;
        // 模拟延迟一段时间,随后进行赋值
        setTimeout(() => {
          // 然后赋值给brands
          this.brands = [
            {"id": 2032,"name": "OPPO", "image": "1.jpg","letter": "O"},
            {"id": 2033, "name": "飞利浦","image": "2.jpg", "letter": "F"},
            {"id": 2034,"name": "华为","image": "3.jpg","letter": "H"},
            {"id": 2036,"name": "酷派","image": "4.jpg","letter": "K"},
            {"id": 2037,"name": "魅族","image": "5.jpg","letter": "M"}
          ];
          this.totalBrands = brands.length;
          // 完成赋值后,把加载状态赋值为false
          this.loading = false;
        },400)
      }
    }
  }
</script>
刷新页面查看:

注意,我们上面提供的假数据,因此大家的页面可能看不到图片信息!
3.2.4.优化页面
编辑和删除按钮
我们将来要对品牌进行增删改,需要给每一行数据添加 修改删除的按钮,一般放到改行的最后一列:

其实就是多了一列,只是这一列没有数据,而是两个按钮而已。
我们先在头(headers)中添加一列:
headers: [
    {text: 'id', align: 'center', value: 'id'},
    {text: '名称', align: 'center', sortable: false, value: 'name'},
    {text: 'LOGO', align: 'center', sortable: false, value: 'image'},
    {text: '首字母', align: 'center', value: 'letter', sortable: true,},
    {text: '操作', align: 'center', value: 'id', sortable: false}
]
然后在模板中添加按钮:
<template slot="items" slot-scope="props">
  <td>{{ props.item.id }}</td>
  <td class="text-xs-center">{{ props.item.name }}</td>
  <td class="text-xs-center"><img :src="props.item.image"></td>
  <td class="text-xs-center">{{ props.item.letter }}</td>
  <td class="justify-center">
    编辑/删除
  </td>
</template>
因为不知道按钮怎么写,先放个普通文本看看:

然后在官方文档中找到按钮的用法:

修改我们的模板:
<template slot="items" slot-scope="props">
    <td>{{ props.item.id }}</td>
    <td class="text-xs-center">{{ props.item.name }}</td>
    <td class="text-xs-center"><img :src="props.item.image"></td>
    <td class="text-xs-center">{{ props.item.letter }}</td>
    <td class="justify-center layout">
        <v-btn color="info">编辑</v-btn>
        <v-btn color="warning">删除</v-btn>
    </td>
</template>
新增按钮
因为新增根某个品牌无关,是独立的,因此我们可以放到表格的外面:

效果:

卡片(card)
为了不让按钮显得过于孤立,我们可以将按新增按钮和表格放到一张卡片(card)中。
我们去官网查看卡片的用法:

卡片v-card包含四个基本组件:
- v-card-media:一般放图片或视频
- v-card-title:卡片的标题,一般位于卡片顶部
- v-card-text:卡片的文本(主体内容),一般位于卡片正中
- v-card-action:卡片的按钮,一般位于卡片底部
我们可以把新增的按钮放到v-card-title位置,把table放到下面,这样就成一个上下关系。
  <v-card>
    <!-- 卡片的头部 -->
    <v-card-title>
      <v-btn color="primary">新增</v-btn>
    </v-card-title>
    <!-- 分割线 -->
    <v-divider/>
    <!--卡片的中部-->
    <v-data-table
      :headers="headers"
      :items="brands"
      :pagination.sync="pagination"
      :total-items="totalBrands"
      :loading="loading"
      class="elevation-1"
    >
      <template slot="items" slot-scope="props">
        <td>{{ props.item.id }}</td>
        <td class="text-xs-center">{{ props.item.name }}</td>
        <td class="text-xs-center"><img :src="props.item.image"></td>
        <td class="text-xs-center">{{ props.item.letter }}</td>
        <td class="justify-center layout">
          <v-btn color="info">编辑</v-btn>
          <v-btn color="warning">删除</v-btn>
        </td>
      </template>
    </v-data-table>
  </v-card>
效果:

添加搜索框
我们还可以在卡片头部添加一个搜索框,其实就是一个文本输入框。
查看官网中,文本框的用法:

- name:字段名,表单中会用到
- label:提示文字
- value:值。可以用v-model代替,实现双向绑定
修改模板,添加输入框:
<v-card-title>
    <v-btn color="primary">新增品牌</v-btn>
    <!--搜索框,与search属性关联-->
    <v-text-field label="输入关键字搜索" v-model="search"/>
</v-card-title>
需要在data中添加属性:search

效果:

发现输入框变的超级长!!!
这个时候,我们可以使用Vuetify提供的一个空间隔离工具:

修改代码:
    <v-card-title>
      <v-btn color="primary">新增品牌</v-btn>
      <!--空间隔离组件-->
      <v-spacer />
      <!--搜索框,与search属性关联-->
      <v-text-field label="输入关键字搜索" v-model="search"/>
    </v-card-title>
给搜索框添加搜索图标
查看textfiled的文档,发现:

通过append-icon属性可以为 输入框添加后置图标,所有可用图标名称可以到 material-icons官网去查看。
修改我们的代码:
<v-text-field label="输入关键字搜索" v-model="search" append-icon="search"/>
把文本框变紧凑
搜索框看起来高度比较高,页面不够紧凑。这其实是因为默认在文本框下面预留有错误提示空间。通过下面的属性可以取消提示:

修改代码:
<v-text-field label="输入关键字搜索" v-model="search" append-icon="search" hide-details/>效果:

几乎已经达到了原来一样的效果了吧!
3.3.后台提供查询接口
前台页面已经准备好,接下来就是后台提供数据接口了。
3.3.1.数据库表
CREATE TABLE `tb_brand` (
  `id` bigint(20) NOT NULL AUTO_INCREMENT COMMENT '品牌id',
  `name` varchar(50) NOT NULL COMMENT '品牌名称',
  `image` varchar(200) DEFAULT '' COMMENT '品牌图片地址',
  `letter` char(1) DEFAULT '' COMMENT '品牌的首字母',
  PRIMARY KEY (`id`)
) ENGINE=InnoDB AUTO_INCREMENT=325400 DEFAULT CHARSET=utf8 COMMENT='品牌表,一个品牌下有多个商品(spu),一对多关系';
简单的四个字段,不多解释。
这里需要注意的是,品牌和商品分类之间是多对多关系。因此我们有一张中间表,来维护两者间关系:
CREATE TABLE `tb_category_brand` (
  `category_id` bigint(20) NOT NULL COMMENT '商品类目id',
  `brand_id` bigint(20) NOT NULL COMMENT '品牌id',
  PRIMARY KEY (`category_id`,`brand_id`)
) ENGINE=InnoDB DEFAULT CHARSET=utf8 COMMENT='商品分类和品牌的中间表,两者是多对多关系';
但是,你可能会发现,这张表中并没有设置外键约束,似乎与数据库的设计范式不符。为什么这么做?
- 外键会严重影响数据库读写的效率
- 数据删除时会比较麻烦
在电商行业,性能是非常重要的。我们宁可在代码中通过逻辑来维护表关系,也不设置外键。
3.3.2.实体类
@Table(name = "tb_brand")
public class Brand {
    @Id
    @KeySql(useGeneratedKeys = true)
    private Long id;
    private String name;// 品牌名称
    private String image;// 品牌图片
    private Character letter;
    // getter setter 略
}
3.3.3.mapper
通用mapper来简化开发:
public interface BrandMapper extends Mapper<Brand> {
}
3.3.4.controller
编写controller先思考四个问题,这次没有前端代码,需要我们自己来设定
- 请求方式:查询,肯定是Get
- 请求路径:分页查询,/brand/page
请求参数:根据我们刚才编写的页面,有分页功能,有排序功能,有搜索过滤功能,因此至少要有5个参数:
- page:当前页,int
- rows:每页大小,int
- sortBy:排序字段,String
- desc:是否为降序,boolean
- key:搜索关键词,String
响应结果:分页结果一般至少需要两个数据
- total:总条数
- items:当前页数据
- totalPage:有些还需要总页数
这里我们封装一个类,来表示分页结果:
public class PageResult<T> {
    private Long total;// 总条数
    private Long totalPage;// 总页数
    private List<T> items;// 当前页数据

    public PageResult() {
    }

    public PageResult(Long total, List<T> items) {
        this.total = total;
        this.items = items;
    }

    public PageResult(Long total, Long totalPage, List<T> items) {
        this.total = total;
        this.totalPage = totalPage;
        this.items = items;
    }
}另外,这个PageResult以后可能在其它项目中也有需求,因此我们将其抽取到ly-common中,提高复用性:

接下来,我们编写Controller
@RestController
@RequestMapping("brand")
public class BrandController {

    @Autowired
    private BrandService brandService;

    @GetMapping("page")
    public ResponseEntity<PageResult<Brand>> queryBrandByPage(
            @RequestParam(value = "page", defaultValue = "1") Integer page,
            @RequestParam(value = "rows", defaultValue = "5") Integer rows,
            @RequestParam(value = "sortBy", required = false) String sortBy,
            @RequestParam(value = "desc", defaultValue = "false") Boolean desc,
            @RequestParam(value = "key", required = false) String key) {
        PageResult<Brand> result = this.brandService.queryBrandByPageAndSort(page,rows,sortBy,desc, key);
        if (result == null || result.getItems().size() == 0) {
            return new ResponseEntity<>(HttpStatus.NOT_FOUND);
        }
        return ResponseEntity.ok(result);
    }
}
3.3.5.Service
@Service
public class BrandService {

    @Autowired
    private BrandMapper brandMapper;

    public PageResult<Brand> queryBrandByPageAndSort(
            Integer page, Integer rows, String sortBy, Boolean desc, String key) {
        // 开始分页
        PageHelper.startPage(page, rows);
        // 过滤
        Example example = new Example(Brand.class);
        if (StringUtils.isNotBlank(key)) {
            example.createCriteria().orLike("name", "%" + key + "%")
                    .orEqualTo("letter", key);
        }
        if (StringUtils.isNotBlank(sortBy)) {
            // 排序
            String orderByClause = sortBy + (desc ? " DESC" : " ASC");
            example.setOrderByClause(orderByClause);
        }
        // 查询
        List<Brand> list = brandMapper.selectByExample(example);
        if(CollectionUtils.isEmpty(list)){
            throw new LyException(HttpStatus.NOT_FOUND, "没有查询到品牌信息");
        }
        // 获取分页对象
        PageInfo<Brand> pageInfo = new PageInfo<>(list);
        // 返回结果
        return new PageResult<>(pageInfo.getTotal(), list);
    }
}
完整结构:

3.3.6.测试
通过浏览器访问试试:http://api.leyou.com/api/item/brand/page

接下来,去页面请求数据并渲染
3.4.异步查询工具axios
异步查询数据,自然是通过ajax查询,大家首先想起的肯定是jQuery。但jQuery与MVVM的思想不吻合,而且ajax只是jQuery的一小部分。因此不可能为了发起ajax请求而去引用这么大的一个库。
https://www.kancloud.cn/yunye/axios/234845
3.3.1.axios入门
Vue官方推荐的ajax请求框架叫做:axios,看下demo:

axios支持Http的所有7种请求方式,并且有对应的方法如:Get、POST与其对应。另外这些方法最终返回的是一个Promise,对异步调用进行封装。因此,我们可以用.then() 来接收成功时回调,.catch()完成失败时回调
axios的Get请求语法:
axios.get("/item/category/list?pid=0") // 请求路径和请求参数拼接
    .then(function(resp){
        // 成功回调函数
    })
    .catch(function(){
        // 失败回调函数
    })
// 参数较多时,可以通过params来传递参数
axios.get("/item/category/list", {
        params:{
            pid:0
        }
    })
    .then(function(resp){})// 成功时的回调
    .catch(function(error){})// 失败时的回调
axios的POST请求语法:
比如新增一个用户
axios.post("/user",{
        name:"Jack",
        age:21
    })
    .then(function(resp){})
.catch(function(error){})- 注意,POST请求传参,不需要像GET请求那样定义一个对象,在对象的params参数中传参。post()方法的第二个参数对象,就是将来要传递的参数
PUT和DELETE请求与POST请求类似
3.3.2.axios的全局配置
而在我们的项目中,已经引入了axios,并且进行了简单的封装,在src下的http.js中:

http.js中对axios进行了一些默认配置:
import Vue from 'vue'
import axios from 'axios'
import config from './config'
// config中定义的基础路径是:http://api.leyou.com/api
axios.defaults.baseURL = config.api; // 设置axios的基础请求路径
axios.defaults.timeout = 2000; // 设置axios的请求时间

Vue.prototype.$http = axios;// 将axios赋值给Vue原型的$http属性,这样所有vue实例都可使用该对象
- http.js中导入了config的配置,还记得吗?

- http.js对axios进行了全局配置:
baseURL=config.api,即http://api.leyou.com/api。因此以后所有用axios发起的请求,都会以这个地址作为前缀。 - 通过
Vue.property.$http = axios,将axios赋值给了 Vue原型中的$http。这样以后所有的Vue实例都可以访问到$http,也就是访问到了axios了。
3.3.3.测试一下:
我们在组件MyBrand.vue的getDataFromServer方法,通过$http发起get请求,测试查询品牌的接口,看是否能获取到数据:

注意:有了上面的铺垫,就可以理解这个路径的问题了,实际路径就是    http://api.leyou.com/api/item/brand/page

在这个路径中,api.leyou.com/api 就可以直接映射到后台网关的服务中,进入服务以后,发现网关服务中有一个

/item/** 路径和item匹配,所以就可以直接匹配到 item-service服务中了,进入这item-servie以后,通过/brand/page

就可以找到该服务的controller中,然后就可以调用service层处理该业务了!!!
网络监视:

控制台结果:

可以看到,在请求成功的返回结果response中,有一个data属性,里面就是真正的响应数据。
响应结果中与我们设计的一致,包含3个内容:
- total:总条数,目前是165
- items:当前页数据
- totalPage:总页数,我们没有返回
3.5.异步加载品牌数据
虽然已经通过ajax请求获取了品牌数据,但是刚才的请求没有携带任何参数,这样显然不对。我们后端接口需要5个参数:
- page:当前页,int
- rows:每页大小,int
- sortBy:排序字段,String
- desc:是否为降序,boolean
- key:搜索关键词,String
而页面中分页信息应该是在pagination对象中,我们通过浏览器工具,查看pagination中有哪些属性:
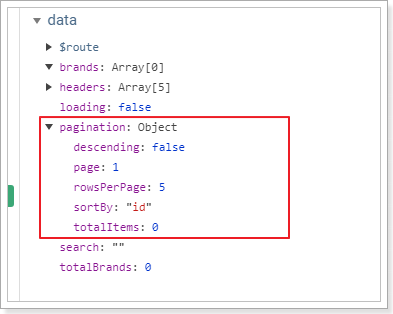
分别是:
- descending:是否是降序,对应请求参数的desc
- page:当前页,对应参数的page
- rowsPerpage:每页大小,对应参数中的rows
- sortBy:排序字段,对应参数的sortBy
缺少一个搜索关键词,这个应该是通过v-model与输入框绑定的属性:search。这样,所有参数就都有了。
另外,不要忘了把查询的结果赋值给brands和totalBrands属性,Vuetify会帮我们渲染页面。
接下来,我们在getDataFromServer方法中完善请求参数:
// 发起请求
this.$http.get("/item/brand/page",{
        params:{
            key: this.search, // 搜索条件
            page: this.pagination.page,// 当前页
            rows: this.pagination.rowsPerPage,// 每页大小
            sortBy: this.pagination.sortBy,// 排序字段
            desc: this.pagination.descending// 是否降序
        }
    }).then(resp => { // 这里使用箭头函数
        // 将得到的数据赋值给本地属性
        this.brands = resp.data.items;
        this.totalBrands = resp.data.total;
        // 完成赋值后,把加载状态赋值为false
        this.loading = false;
    })
查看网络请求:

效果:

3.6.完成分页和过滤
3.6.1.分页
现在我们实现了页面加载时的第一次查询,你会发现你点击分页并没发起请求,怎么办?
虽然点击分页,不会发起请求,但是通过浏览器工具查看,会发现pagination对象的属性一直在变化:
我们可以利用Vue的监视功能:watch,当pagination发生改变时,调用我们的回调函数,我们在回调函数中进行数据的查询即可!
具体实现:

刷新页面测试,成功实现分页功能:

3.6.2.过滤
分页实现了,过滤也很好实现了。过滤字段对应的是search属性,我们只要监视这个属性即可:

查看网络请求:

页面结果:

3.7.完整代码
<template>
  <v-card>
    <v-card-title>
      <v-btn color="primary" @click="addBrand">新增品牌</v-btn>
      <!--搜索框,与search属性关联-->
      <v-spacer/>
      <v-text-field label="输入关键字搜索" v-model.lazy="search" append-icon="search" hide-details/>
    </v-card-title>
    <v-divider/>
    <v-data-table
      :headers="headers"
      :items="brands"
      :search="search"
      :pagination.sync="pagination"
      :total-items="totalBrands"
      :loading="loading"
      class="elevation-1"
    >
      <template slot="items" slot-scope="props">
        <td>{{ props.item.id }}</td>
        <td class="text-xs-center">{{ props.item.name }}</td>
        <td class="text-xs-center"><img :src="props.item.image"></td>
        <td class="text-xs-center">{{ props.item.letter }}</td>
        <td class="justify-center layout">
          <v-btn color="info">编辑</v-btn>
          <v-btn color="warning">删除</v-btn>
        </td>
      </template>
    </v-data-table>
  </v-card>
</template>

<script>
  import MyBrandForm from './MyBrandForm'
  export default {
    name: "my-brand",
    data() {
      return {
        search: '', // 搜索过滤字段
        totalBrands: 0, // 总条数
        brands: [], // 当前页品牌数据
        loading: true, // 是否在加载中
        pagination: {}, // 分页信息
        headers: [
          {text: 'id', align: 'center', value: 'id'},
          {text: '名称', align: 'center', sortable: false, value: 'name'},
          {text: 'LOGO', align: 'center', sortable: false, value: 'image'},
          {text: '首字母', align: 'center', value: 'letter', sortable: true,},
          {text: '操作', align: 'center', value: 'id', sortable: false}
        ]
      }
    },
    mounted() { // 渲染后执行
      // 查询数据
      this.getDataFromServer();
    },
    watch: {
      pagination: { // 监视pagination属性的变化
        deep: true, // deep为true,会监视pagination的属性及属性中的对象属性变化
        handler() {
          // 变化后的回调函数,这里我们再次调用getDataFromServer即可
          this.getDataFromServer();
        }
      },
      search: { // 监视搜索字段
        handler() {
          this.getDataFromServer();
        }
      }
    },
    methods: {
      getDataFromServer() { // 从服务的加载数的方法。
        // 发起请求
        this.$http.get("/item/brand/page", {
          params: {
            key: this.search, // 搜索条件
            page: this.pagination.page,// 当前页
            rows: this.pagination.rowsPerPage,// 每页大小
            sortBy: this.pagination.sortBy,// 排序字段
            desc: this.pagination.descending// 是否降序
          }
        }).then(resp => { // 这里使用箭头函数
          this.brands = resp.data.items;
          this.totalBrands = resp.data.total;
          // 完成赋值后,把加载状态赋值为false
          this.loading = false;
        })
      }
    }
  }
</script>

<style scoped>

</style>
本作品采用 知识共享署名-相同方式共享 4.0 国际许可协议 进行许可。